Quick Start
This page introduces key EmbedOps concepts designed to enhance your embedded development workflow. It will walk through the steps needed to configure your first EmbedOps project, using either an example project, or a project of your own. At the end of the Quick Start you will have a functioning development environment and a pipeline you can run locally or on a CI provider of your choice.
You will learn how to:
- Connect your repository to the EmbedOps platform
- Use embedded-focused templates to:
- Add a build environment
- Add static code analysis checking
- Use Dev Containers with your Continuous Integration (CI) provider
- Analyze project memory via an ELF file
Dev Container vs. Host machine
- Some commands in this Quick Start are run on your host machine, and some are run in a Dev Container. To differentiate,
host>andcontainer>will be used as the terminal prompts to clarify where the command is run.
1. Sign up for a free account
The EmbedOps Platform is the web application part of EmbedOps. Signing up gives you access to the EmbedOps Templates, and features such as memory analysis and hardware-in-the-loop testing.
Head to the EmbedOps Sign Up Page for a free account. This is required for the rest of the Quick Start to work. During the sign-up process, you should receive an email asking you to verify your email address.
2. Install Dependencies
Docker
EmbedOps depends on Dev Containers, which require a running Docker runtime on your machine. You can install Docker Desktop for your OS, provided your organization meets the free license criteria, or you can install Docker alternatives.
VS Code
Dev Containers have multiple supporting tools and services, but our favorite way to interact with them is to install VS Code and the Dev Containers Extension. The example project used in this Quick Start will be using this setup.
3. Install EmbedOps CLI (eo)
The EmbedOps CLI is the main way you will interact with embedops features and functionality. You can install the CLI with the following commands:
host> mkdir -p /usr/local/bin && cd /usr/local
host> curl -fsSL https://gitlab.com/embedops-public/embedops-cli/-/raw/main/install.sh | sh
Troubleshooting
If you get permissions issue during the curl, /usr/local needs elevated privileges, add sudo in front of sh
Validate that everything is working by running:
You should see output similar to:
Check the version you have installed:
For more details, see Installing.
4. Log In with eo
To run the commands in this Quick Start, you first need to log in to the EmbedOps platform via the CLI:
This command will open a browser, prompting you to sign in with the account you created earlier. If you are already signed in, the browser should close automatically after retrieving your credentials.
5. Setting up your code repo
EmbedOps supports popular embedded firmware development stacks (with more to come!). For this Quick Start, we recommend forking the STM32 Quick Start project. Forking the project into your own user or organization group within your Git provider is highly recommended so that you can push changes and validate the CI pipeline examples in this Quick Start.
For the example project, use gitlab so you can follow the exact steps below.
6. Connect your repo to the platform
After forking the repo and downloading a copy to your host machine, you'll need to connect it to the EmbedOps platform and create an initial Dev Container and CI setup.
EmbedOps Projects and Repositories
Connecting your project to the EmbedOps Platform lets you link your git repository to a corresponding repository on EmbedOps. The EmbedOps repository contain memory metrics, HIL tests, and links to your shared git repo on gitlab/github/bitbucket. The EmbedOps repository is part of an EmbedOps Project, which can contain multiple EmbedOps Repositories. For more info, take a look at the EmbedOps Projects Page.
Connect it by running the following in the root of the repository:
It will prompt you for your preferred CI provider and linux distribution.For the example project with gitlab, set pipeline provider to "gitlab" and the linux distribution to "ubuntu".
Warning
If you've registered git repos with EmbedOps platform before, you may have multiple EmbedOps Projects registered on the EmbedOps Platform, and will be prompted on which project to add this to. Select "Trial Project".
After running the above command, you now have:
- a
repo_id.ymlthat will connect this repository to the EmbedOps platform - a
template-settings.ymlthat saves what you selected above.- For the example project, the pipeline provider will be set to gitlab
- an initial empty dev container configuration
- For the example project, it will use an ubuntu image as the base container
- an initial empty CI configuration
- For the example project, it will generate a
gitlab-ci.ymlfile and the/cifolder
- For the example project, it will generate a
7. Apply Templates
EmbedOps includes a collection of Templates that you can apply to your project. These templates help you quickly set up a Dev Container for specific build environments or tools. They're are a combination of files on your local filesystem, pipeline/CI scripts, and dev container features that work together to provide functionality with a single eo add command. These templates are managed by the EmbedOps Platform and the EmbedOps team.
7a. Add a build toolchain
Run the following command to add an an ARM bare-metal GCC build environment to a Dev Container. The command prompts you for details to help tailor the template:
For the example project, select make as the build command.
Below is a video demonstrating the terminal output:
After running the command, you now have:
- A Dev Container with a build toolchain environment you can commit to version control for others to use
- The included Dev Container configuration uses a Dev Container feature created by the EmbedOps team.
- A CI YAML job that builds the project for the specified Git/CI provider
Using EmbedOps CLI
The EmbedOps CLI (eo) is installed inside the dev container, along with extra configuration to connect eo credentials between your host machine and the container. So future eo commands can be run in either the host or the container!
For the example project, you can now build the project yourself manually in the Dev Container. To get into the Dev container, go to the Dev Container extension in VS Code and click the "+" at the top to open the drop down selection. Select "Open Current Folder in Container", and it will auto create the dev container and restart VS Code with the terminal running in the container. To learn more about dev containers in VSCode, see these Dev Container docs.
The build command for the example project:
Running commands outside the Dev Container
- If you are NOT using VS Code, you can install the devcontainer CLI and run commands like so:
7b. Add the Cppcheck tool
It's common to want a static analysis tool to run both locally and in a CI pipeline. Run the following command to add the static analysis tool Cppcheck to the Dev container. If a dev container is not already created, it will create one, if you previously ran the eo add arm-none-gcc-build command, the CLI will merge JSON and YAML snippets into the existing files.
For the example project, select src/app as the location of application logic.
The video below demonstrates the terminal output:
After running the command, you now have:
- A Dev Container containing the
cppcheckcommand-line tool - A CI YAML job that runs Cppcheck with a basic configuration on your chosen Git/CI provider
To validate that Cppcheck is working inside the Quick Start project’s Dev Container, run:
Troubleshooting
If the container claims that cppcheck doesn't exist, double check that you've re-built the Dev Container! For the example project, go to the Dev Containers extension, right click on the previously created dev container (called stm32-quick-start), and select "Rebuild Container"
7c. Running the pipeline locally
You've now applied two EmbedOps Templates (arm-none-gcc-build and cppcheck). Part of these Templates includes adding the build and cpp checks to a pipeline you can run on a CI provider (more below), or they can be run locally.
To run the pipeline you've created locally, use the command eo build
Under the hood
What's the eo build doing? It's running the individual steps from the pipeline locally inside the dev container. You can see which commands it's running yourself by opening the ci/pipeline.json file. E.g. for this quick start project, you should see this:
    {
        "steps": [
            "echo 'Starting pipeline...'",
            "ci/arm-none-gcc-build.sh",
            "ci/cppcheck.sh"
        ]
    }
Example video of the output when run locally:
8. Continuous Integration (CI)
In the files generated by Step 7, you’ll find configuration files for your chosen Git provider’s built-in CI system (GitHub, GitLab, or Bitbucket). Once you push these files to your remote repository, your CI should automatically trigger two jobs:
- ARM GCC build
- Cppcheck Run
For Bitbucket Users
You must Enable Pipelines before these CI jobs can run. Go to Repository Settings > Pipelines > Settings in your Bitbucket repo and toggle Pipelines on.
For the example project, a gitlab-ci.yml file will be generated, which pulls in the ci/* files to make the pipeline run the gcc build and cppcheck. Make sure to add these files in git, commit, and push them to gitlab. Once that is done, you can go to the Build-> Pipelines section of your project on gitlab, and see the pipeline automatically being kicked off and completed.

9. BONUS: Analyze project memory via an ELF file
The above steps walked you through creating a dev container that lets you build your project, add static analysis, and run a pipeline both locally and on CI. EmbedOps offers even more than that, so let's look at some other useful functionality: a memory analysis tool that lets you choose an ELF file for generating a Treemap diagram of what’s consuming space in the binary.
-
Make sure the project has been built. For the example project, the command is:
-
Run the memory analysis tool:
This command will give a list of ELF files to choose from. For the example project, you will have the ELF file at build/stm/debug/src/embedops-dev-demo.elf. Select that by pressing enter in the prompt.
Below is a video demonstrating the terminal output:
After analysis completes, the CLI attempts to open a browser window to display the resulting diagram. It also prints the URL for your convenience. This diagram is rendered using the EmbedOps platform and may look like this:
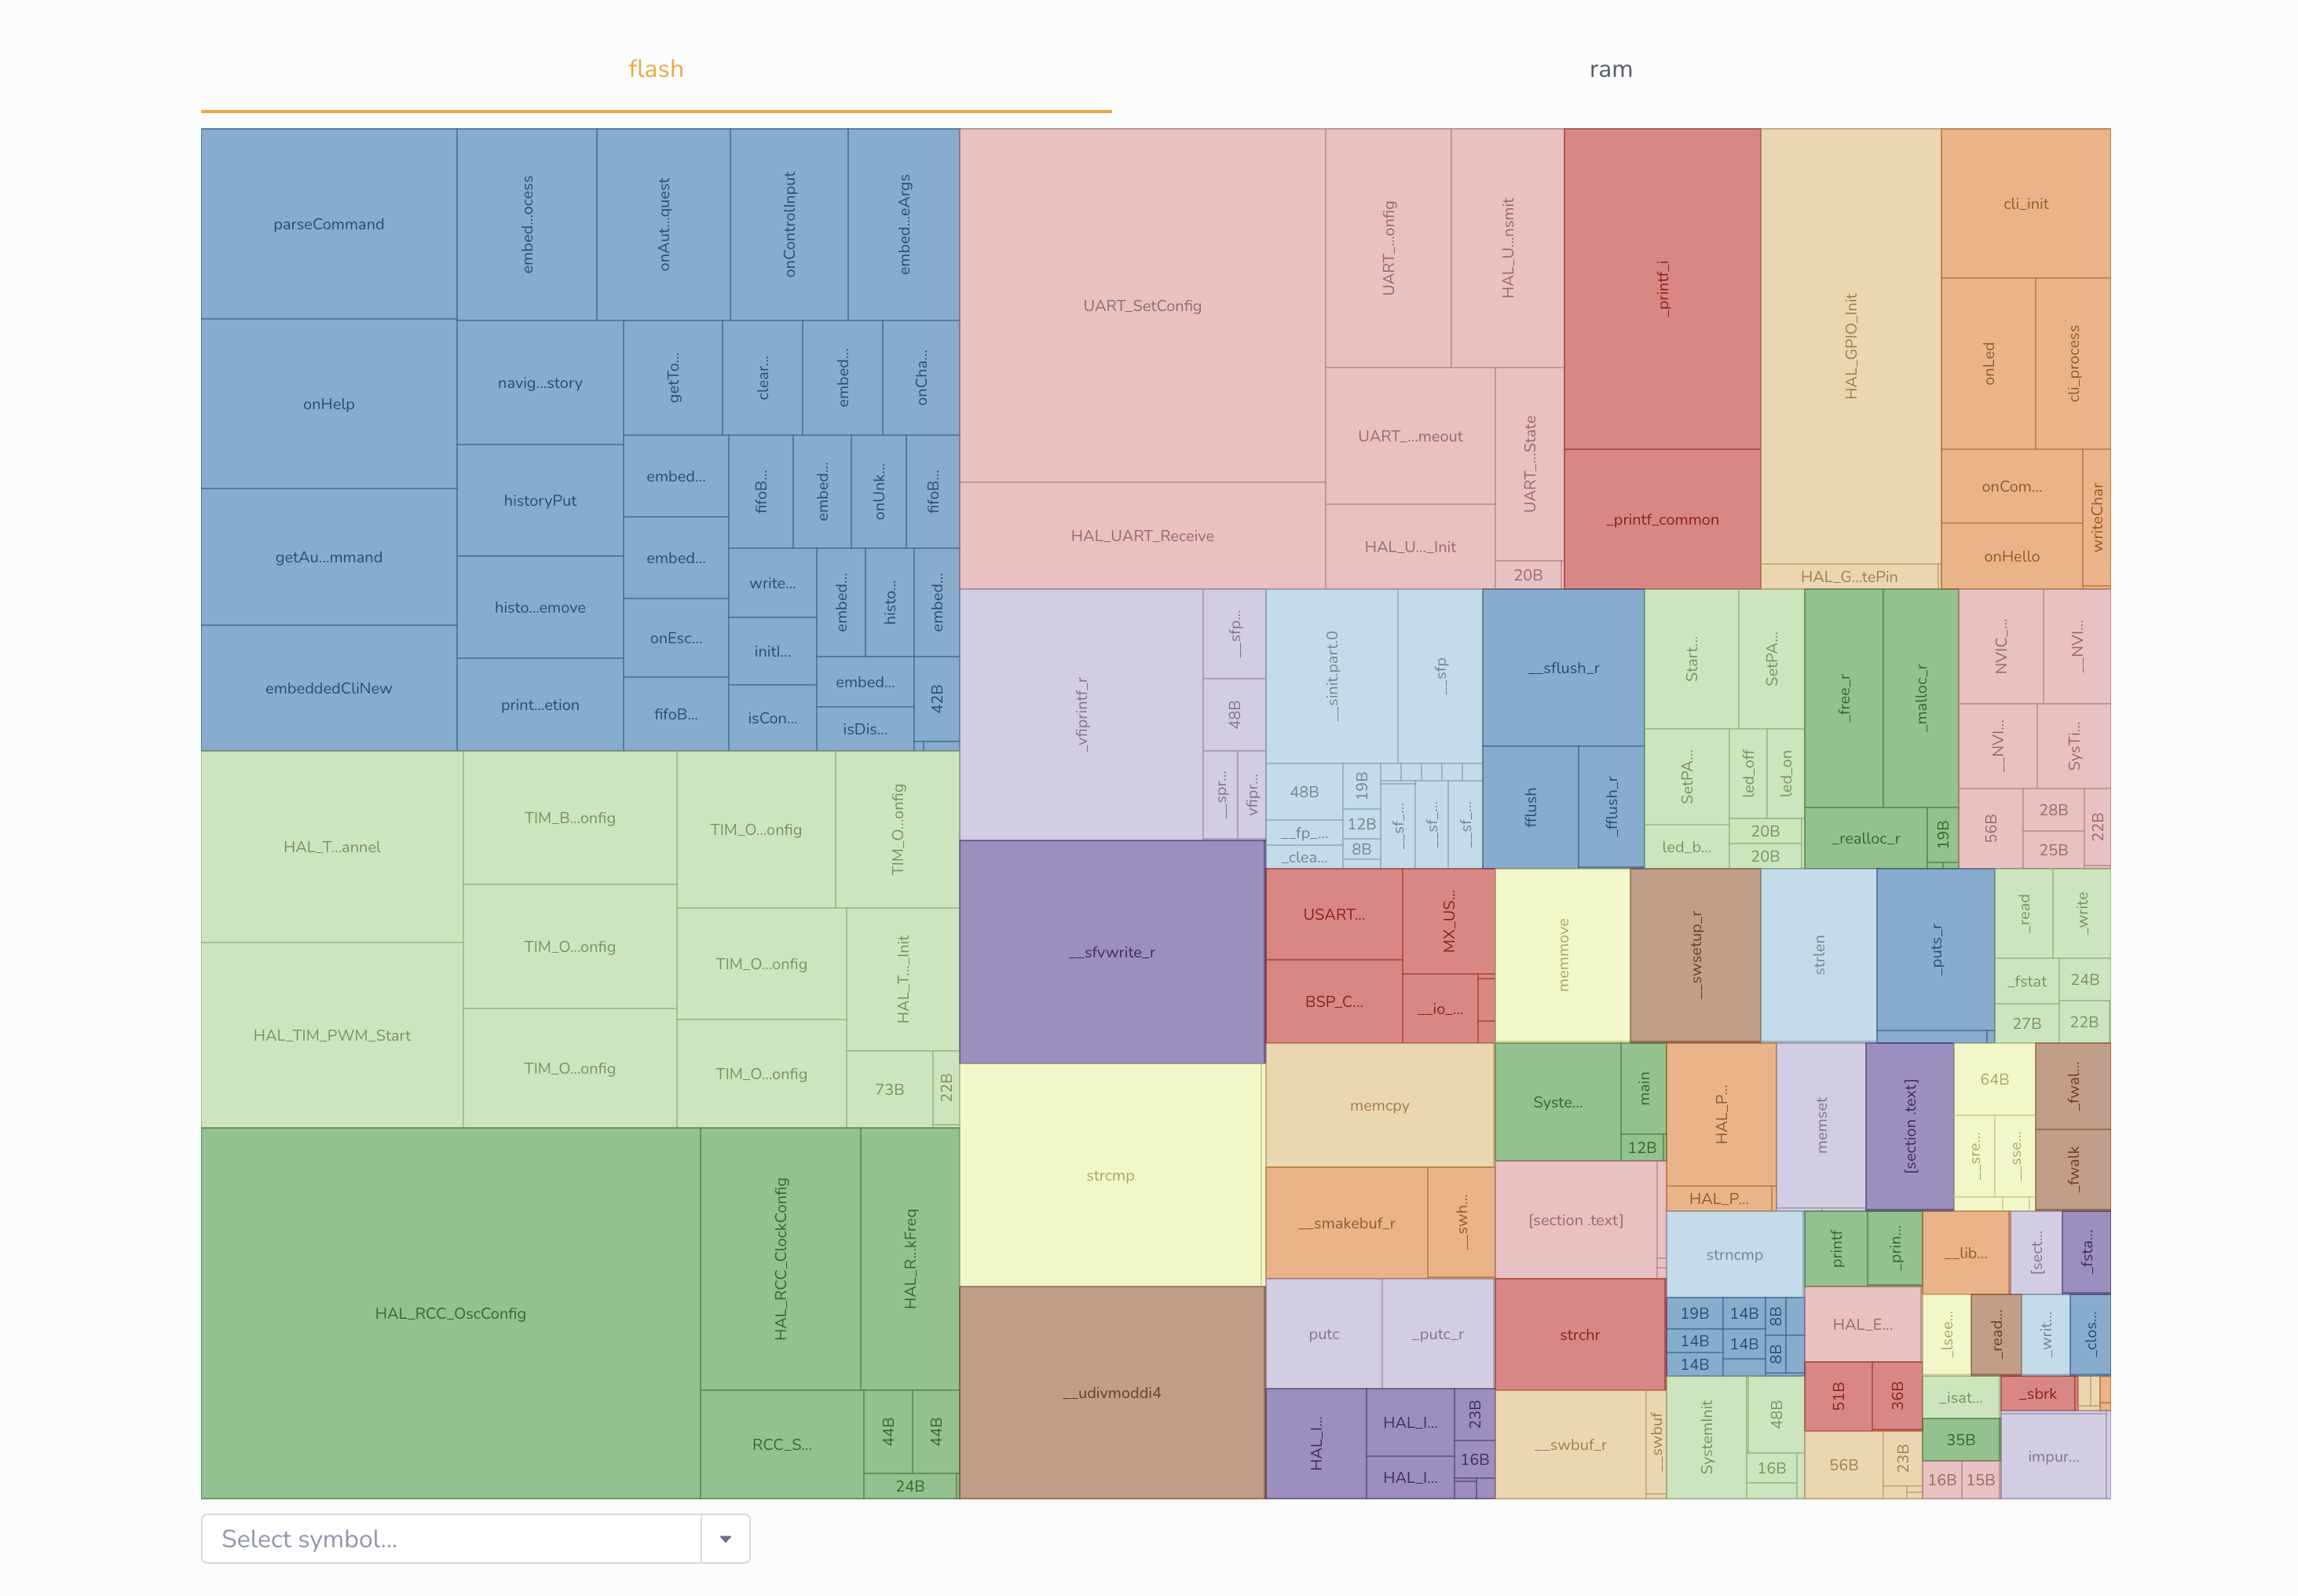
The diagram on the EmbedOps platform is interactive, so feel free to click around and toggle between flash and RAM analysis!
Next Steps
Congratulations on completing the Quick Start! You’ve successfully set up your repository, installed the CLI, and explored some of the general tools EmbedOps CLI has to offer.
If you’d like to integrate a Hardware-In-The-Loop (HIL) setup using the EmbedOps approach, check out our HIL Quick Start.